Recently, we did several OpenWrt installs on Cyberoam CR15wiNG and CR25wiNG devices. Both of these models include wireless networking. Both have matching wired-only sister models, CR15iNG and CR25iNG respectively, so the installation process for those should be nearly identical, but shorter (no need to configure wireless networking). There are also slightly larger CR35iNG and CR35wiNG models.
This note is intended for the relatively new users who have some experience with general computing and system administration but are not (yet) comfortable with flashing firmware and need some friendly handholding to get through the process.
Introduction
Cyberoam is an Indian network security company that was acquired by Sophos in 2014. The CR15wiNG and CR25wiNG models are implemented in a desktop form factor with three wireless antennas:
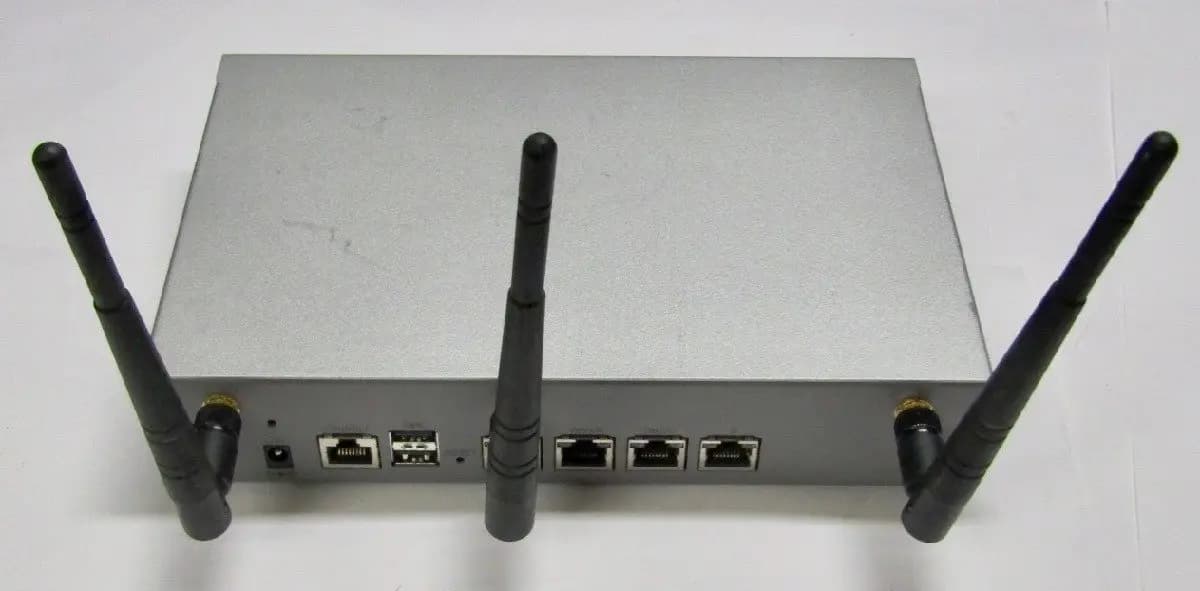
The image above shows the back panel of a CR25wiNG unit; note four Ethernet ports, the leftmost of which is almost entirely obscured by the middle antenna. The CR15wiNG is visually similar and identically sized, but has only three Ethernet ports. The CR35wiNG is wider and has six Ethernet ports,
Under the hood, our CR15wiNG was running an AMD G-T24L processor with 2 GB of RAM and a 4 GB Compact Flash (CF) card as the sole storage device. The CR25wiNG had an AMD G-T30L processor, also with 2 GB of RAM. The storage situation was a little different: a 2 GB CF card complemented by a 320 GB HGST hard drive. Both models came equipped with Intel 82583V Gigabit Ethernet controllers and Qualcomm Atheros AR93xx wireless network cards.
Note
Both processors are 64-bit, so we will need a 64-bit OpenWrt image for installation on either model.
Power-wise, both models came with 12V / 5A power supply units featuring 5.5-mm barrel plugs.
In terms of management interface, we are not exactly spoiled with choices. There are no video outputs, but there is a single RJ-45 console socket, so that's what we're going to use. Note that the connection speed needed to access BIOS is 9600 bits per second (bps), while OpenWrt by default operates at 115200 bps, so choose your connection speed depending on what you want to accomplish with the connection. BIOS access keys are F2 and Delete; in our experience, F2 generally worked better.
We believe these are an early-generation units. At some point, Cyberoam upgraded the components on which the devices were built and retained the marketing designations (CR15 / CR25 / CR35) while introducing new model numbers for internal use. The later-generation models have RAM modules soldered onto the motherboard, rather than a removable memory module (aka SODIMM, aka "memory stick").
Installation Options and Plan of Work
For sheer repeatability (as well as for sheer laziness — no desire to open up the cases), we decided to install OpenWrt on CF cards on both models. Another possibility was to remove the CF card from the CR25wiNG and install OpenWrt on the hard drive. Yet another possibility was to still remove the CF card from the CR25wiNG, but replace the hard drive with a SATA SSD and install OpenWrt on that SSD. In terms of installation actions this really doesn't matter. You need some kind of boot drive; exactly what kind is a secondary consideration.
Next, we had to decide if we wanted to take the CF cards out of their respective devices and write OpenWrt onto them directly or boot the devices from a USB stick and copy OpenWrt onto the CF cards from there. We chose the latter (again, we just didn't feel like taking the devices apart and cleaning up the sticky residue of the warranty seals we'd have to remove).
So here's the plan of work we came up with:
- Write an OpenWrt image onto a USB stick
- Boot the device from that USB stick
- Install OpenWtr onto the device's CF card
- Set up wireless networking (on x86, it may or may not work out of the box), and finally,
- Make the entire CF card accessible to OpenWrt (more on that later)
Preparations
To follow along, you will need (in addition to an operational CR something or other):
- A computer with console connection software (we used a Linux machine with the
screenutility, but Putty, whether on Linux or Windows, will work just as well) - A console cable (we used the kind that connects the RJ-45 port on the router to a USB port on the administrator's computer)
- An Internet connection
- A pair of Ethernet cables, one to connect the CR to an upstream device, another to connect a client device to the CR when the time comes
Getting OpenWrt
Go to the OpenWrt downloads site:
https://downloads.openwrt.org/
Near the top of the page, there's a section titled Stable Release. Click on the version number (as of this writing, 22.03.2). This will take you to a list of "targets" (various systems for which OpenWrt is available). Scroll to the end of the page and click on x86. On the page that opens, click on 64; this will take you to the downloads for 64-bit PCs and derivatives.
Generally speaking, there are four installation images to choose from (there are others, but they are made for some very specific situations, and we're not in one of them). You can choose a BIOS or UEFI image with either ext4 or SquashFS file system on the root partition. Given the age of the devices, we thought BIOS would be a safer choice. As for the file system, we are slightly biased in favor of SquashFS for no particular reason (historically, SquashFS was more resilient in the event of sudden power failure, but ext4 was never bad at it, kept getting better, and might have caught up). So we chose the generic-squashfs-combined.img.gz image, downloaded it, and created a bootable USB stick from it using Rufus on a Windows machine. Needless to say, there is plenty of other software that does exactly that, so you have options.
First Boot
On a CR15 device, there are three Ethernet ports labeled LAN/A, WAN/B, and DMZ/C. CR25 has them as well; its fourth port is labeled simply D.
Generally, on the first run, OpenWrt designates the first port it can find as the WAN port. In our case, this would mean that OpenWrt would designate as WAN the port that is labeled LAN, which is confusing. However, in this install, OpenWrt was able to fiigure out which port is WAN with no prodding from us. We don't know whether this was a happy accident or had something to do with the fact that we had the router cabled up for Internet access during installation.
So here's our setup before the first boot:
- The CR is off
- The WAN/B port of the CR is connected to an upstream device providing Internet connectivity and DHCP service
- The console port is connected to a USB port on the administrator's computer
- The bootable USB stick is inserted into the USB port on the CR
First, we should initiate the console connection. In our case, this was done by starting the screen utility:
sudo screen /dev/ttyUSB0 115200Note the sudo part; screen requires root-level access to hardware, so it always wants to run as root. Note also that 115200 is the connection speed; if you need a different speed (say, 9600), use that number instead.
When connection starts, the terminal screen goes blank. At this point, turn on the CR, and you should see some output. If you see large amounts of garbage output or legible output that's clearly not OpenWrt, this means that your device is booting from a device other than the USB stick. If that happens, turn off the device, end your screen session (press Ctrl-a, then k, then y), start a new screen session at 9600 bps, turn the device back on and immediately start pressing F2. This will get you into BIOS, where you can change the order of boot devices, so that the first boot device is USB. In our case, however, this wasn't necessary; OpenWrt booted from the USB stick with no additional prodding.
If all goes well, you will eventually see this message among others:
Please press Enter to activate this console.When you see if, do as requested. You will be shown the OpenWrt logo and taken to the command line:
BusyBox v1.35.0 (2022-10-31 22:44:41 UTC) built-in shell (ash)

  _______                     ________        __
 |       |.-----.-----.-----.|  |  |  |.----.|  |_
 |   -   ||  _  |  -__|     ||  |  |  ||   _||   _|
 |_______||   __|_____|__|__||________||__|  |____|
          |__| W I R E L E S S   F R E E D O M
 -----------------------------------------------------
 OpenWrt 22.03.2, r19803-9a599fee93
 -----------------------------------------------------
root@OpenWrt:/#
OpenWrt may continue the start-up process (and spew messages) even after you get to the command line, so give it a moment to finish what it's doing. At this point, the CR should be able to connect to the upstream device and thus the Internet. Test it out:
ping -c 3 google.comYou should see the familiar output of ping.
Now we should install OpenWrt onto the CF card. Here's the problem though: we don't know its system name. So let's find out. For that, we will need a utility called lsblk, which we don't have right now. But, since we're connected to the Internet, we can get it easily. Run this command from the command line:
opkg update && opkg install lsblkTechnically, this is two commands rolled into one: opkg update asks opkg, the OpenWrt package manager, to go online and retrieve a list of packages available for installation, while opkg install lsblk actually installs the package lsblk. If we tried the second without the first, opkg wouldn't be able to install anything; it wouldn't know where to get the package identified only by its name.
Now let's inspect our system:
lsblkOn a CR15, the CF card will be reported as sda and the USB stick as sdb. On a CR25 with the hard drive present, the CF card will be reported as sda, the hard drive, as sdb, and the USB stick, as sdc. You should be able to tell which is which by simply looking at the drive sizes.
Now we need to install OpenWrt onto the CF card. First, let's go to an out-of-the-way place where we can store some temporary files:
cd /tmpNext, let's download OpenWrt (it can be the same image file you downloaded for writing onto the USB stick earlier or a different one; say, you changed your mind and decided to try an ext4 image rather that a squashfs image). Right, now, with 22.03.2 being the current release and assuming we still like squashfs, we would do:
wget https://downloads.openwrt.org/releases/22.03.2/targets/x86/64/openwrt-22.03.2-x86-64-generic-squashfs-combined.img.gzNow let's unzip the downloaded file:
gunzip openwrt-*.img.gzFor quality control, run ls and make sure a file named openwrt-22.03.2-x86-64-generic-squashfs-combined.img (note the .img, rather than .img.gz, ending) is present in your /tmp directory.
Now we can write OpenWrt onto the CF card:
dd if=openwrt-22.03.2-x86-64-generic-squashfs-combined.img bs=1M of=/dev/sdaEssentially, this means "take this image file and write its contents in one-megabyte chunks onto the /dev/sda drive".
Now our CF card should be ready to serve as a boot drive. Stop the device:
haltWait until you see the message:
reboot: Power downWhen you see this message, use the switch on the back of the CR to turn it off. Then, remove the USB stick from the CR. Keep the screen session running; it doesn't terminate when you shut down the device being accessed and simply continues when that device comes on again.
Second Boot
Use the switch on the back of the CR to turn it on again. Once again, watch for the Please press Enter to activate this console message and do as requested.
Now that you're back on the command line, you may want to send another ping to the outside world to ensure you have connectivity. Speaking of connectivity, your connectivity right now is impaired. Your wired connections work, but your wireless card is not even being detected by OpenWrt. To remedy this, we will need a few extra packages. Which ones? Depends on what our Wi-Fi card is. To find out what we have, we can use a utility called lspci. But we don't have it, so let's install it; it is a part of the pciutils package. And once again, since we haven't run opkg since reboot, we will need to let opkg download the inventory before downloading anything:
opkg update && opkg install pciutilsNow we can see what components we have on our unit:
lspci -nnHere's the relevant line in the lspci output:
07:00.0 Network controller [0280]: Qualcomm Atheros AR93xx Wireless Network Adapter [168c:0030] (rev 01)The fastest way to figure out what we need is to pay a quick visit to Hardware for Linux:
https://linux-hardware.org/index.php?id=pci:168c-0030
Note the ending of the URL; it is the same as the PCI identifier of our wireless card (168c:0030), except the colon has been replaced with a dash.
Hardware for Linux tells us that this card has a Linux driver, and that driver is found at the following location in the Linux source code:
drivers/net/wireless/ath/ath9k/pci.cThe part that's important for us here is ath9k. In OpenWrt, drivers for PCI devices are supplied as kernel modules. A kernel module looks like a package whose name starts with kmod-. So we can simply Google kmod-ath9k, and sure enough, this package exists and provides support for the Atheros wireless cards.
Prior experience tells us that an Atheros card will also require the hostapd package.
Now let's get our wireless networking going:
opkg install hostapd kmod-ath9kAfter the packages are installed, you will see some additional activity on the console. There will be messages indicating that a wireless port (wlan0) is available, has been bridged to the LAN, etc. Simply put, good news all around. :)
Once this is done, let's set the root password for our device. Type passwd, press Enter, and follow the prompts. (In case you're wondering, you could have done this before or after; you can do it any time after you boot from the permanent boot drive.)
Now we need to configure the wireless networking. Connect to any of the LAN ports on the CR with an Ethernet cable, open your Web browser, and point it to https://192.168.1.1 (this is the default OpenWrt location). Enter your new password when prompted, then go to Network >> Wireless. On the Wireless screen, click the Edit button. A complicated-looking Device Configuration dialog will open. At the very least, you should do the following:
- Under Advanced Settings on top of the dialog, use the Country Code selector to choose the country you're in. This will tell the router which radio frequencies it is permitted to use (those are regulated to prevent interference with broadcasting, emergency services, and other uses of radio).
- Down the dialog, under General Setup make sure that (1) Mode is set to Access Point, (2) you set ESSID (wireless network name) to something you like, and (3) the Network is set to lan (this will make sure that all your client devices, wired and wireless, will be on the same local network).
- Also down the dialog, under Wireless Security, set Encryption to something secure (I chose WPA2-PSK) and enter the key (network password) under Key. Obviously, if you have a good knowledge of wireless security, you can choose other encryption and authentication options; I am just providing a minimal set of directions here...
When all of this is done, click Save at the bottom of the dialog. The dialog will close, and you will be back to the Wireless Overview. Click Save & Apply on the bottom of the screen and wait for the changes to be made (there will be a pop-up dialog informing you of what's going on). Next, take a look at the button to the left of Edit. Most likely, it says Enable. If so, click it to enable wireless networking. If it says Disable, leave it be; you probably clicked on it before, so wireless is enabled now.
At this point, your device should be fully operational. Just in case, reboot the device to verify that everything that should start at boot actually starts.
Expanding the Root Partition
Your device is working, and you absolutely can use it as is. However, right now, only about 120 megabytes of your disk space is usable. This is plenty for OpenWrt, but if you want, you can still make your entire CF card accessible. This is done by expanding the root partition. You may want to check out the official OpenWrt on x86 Hardware page to see if it has a more recent guidance compared to this post:
https://openwrt.org/docs/guide-user/installation/openwrt_x86
In short, the process of expanding the root partition depends on whether you have a BIOS system or UEFI system. as well as on whether your root partition is ext4 or SquashFS. We have a BIOS system with a SquashFS root partition, so here's what we need to do.
A. Get the Supplies
We will need a small collection of utilities. Some of them we may have already, but opkg is smart enough to figure that out, so let's ask for everything we need:
opkg update && opkg install fdisk losetup resize2fsB. Expand the Root Partition
We will resize the root partition using the fdisk utility. The listing below shows the whole fdisk session we ran interactively (we have copied it from an earlier note, where the target drive was a 64 GB SSD; the process is identical to what you will see in the case of a CF card, a hard drive, or any other data storage device). The manual inputs are shown [[in double square brackets]]; the [[]] sequence indicates pressing Enter with no visible input. It's a bit confusing, but we can't come up with a better formatting scheme right now. So here goes:
root@OpenWrt:~# [[fdisk /dev/sda]]

Welcome to fdisk (util-linux 2.37.3).
Changes will remain in memory only, until you decide to write them.
Be careful before using the write command.

This disk is currently in use - repartitioning is probably a bad idea.
It's recommended to umount all file systems, and swapoff all swap
partitions on this disk.

Command (m for help): [[p]]

Disk /dev/sda: 59.63 GiB, 64023257088 bytes, 125045424 sectors
Disk model: ADATA_IM2S3134N-
Units: sectors of 1 * 512 = 512 bytes
Sector size (logical/physical): 512 bytes / 512 bytes
I/O size (minimum/optimal): 512 bytes / 512 bytes
Disklabel type: dos
Disk identifier: 0xc120d9f5

Device     Boot Start       End   Sectors  Size Id Type
/dev/sda1  *      512     33279     32768   16M 83 Linux
/dev/sda2       33792    246783    212992  104M 83 Linux

Command (m for help): [[d]]
Partition number (1,2, default 2): [[2]]

Partition 2 has been deleted.

Command (m for help): [[n]]
Partition type
   p   primary (1 primary, 0 extended, 3 free)
   e   extended (container for logical partitions)
Select (default p): [[p]]
Partition number (2-4, default 2): [[2]]
First sector (33280-31277231, default 34816): [[33792]]
Last sector, +/-sectors or +/-size{K,M,G,T,P}
    (33792-125045423, default 125045423): [[]]

Created a new partition 2 of type 'Linux' and of size 59.6 GiB.
Partition #2 contains a squashfs signature.

Do you want to remove the signature? [Y]es/[N]o: [[n]]

Command (m for help): [[w]]

The partition table has been altered.
Syncing disks.

root@OpenWrt:~#
Notes:
- This has worked despite the "bad idea" warning.
- Technically, we didn't "extend" the partition; rather, we deleted one, then created a new one starting at the same location and gobbling up all available disk space. However, since there was no write command in-between, the net result was a new, larger partition that "inherited" all data located on the old small partition.
- The number
33792specified in response to theFirst sectorprompt came from the disk information table output in response to thepcommand.
To verify that the changes have taken place, you can run fdisk /dev/sda again and execute another p command to display partitions followed by a q command to quit. Alternatively, you can do fdisk -l; this will not enter the interactive mode, you'll just get the output, and then fdisk will exit.
C. Resize the File System
In our experience, you should start this stage by rebooting the system (run reboot from the command line). If you do the steps below without rebooting, OpenWrt may tell you it has nothing to do and refuse to resize the file system (it looks like some of the changes we made in the previous step need a reboot to set in). So here are the steps to follow after reboot:
BOOT="$(sed -n -e "\|\s/boot\s.*$|{s///p;q}" /etc/mtab)"
DISK="${BOOT%%[0-9]*}"
PART="$((${BOOT##*[^0-9]}+1))"
ROOT="${DISK}${PART}"
LOOP="$(losetup -n -l | sed -n -e "\|\s.*\s${ROOT#/dev}\s.*$|{s///p;q}")"
resize2fs -f ${LOOP}
reboot
After the device reboots, you should be able to use the entire disk.
A Future Project?
As noted above, the CR25 comes with a 320 GB hard drive. In some situations, it would be tempting to use this hard drive as a file storage location. OpenWrt allows deployment of Samba, as well as some lightweight alternatives. So it's entirely possible to configure a hybrid device pulling double duty as a network appliance and a file server. Probably not the best idea for a business, but for a home or a very small office, why not?